Tuesday, July 28, 2009

TWD: Vanilla (Heath Bar) Ice Cream

I can distinctly remember the first time I had heath bar ice cream.


It was during my junior year of high school, and I was in Chemistry AP. (Yeah, I'm a nerd.) Anyways, we were doing an ice cream lab, which was basically my teacher's cover-up for "let's make ice cream and eat it" and we weren't going to complain.


So we were split up into lab groups, and we choose what ice cream flavor we would make amongst us. I was leaning toward a mint chocolate chip, since that was my favorite at the time, but I got beat out by the heath bar option. I am so glad that we did.

We made the ice cream, and then, I fell in love. What a simple but oh so perfect combination! How did I go through those initial 16 years without knowing it?!?!

And now I'm obsessed. I always pick it at ice cream shops because I just can't resist it. So when Tuesdays with Dorie came up with Vanilla Ice Cream, I knew I had to make it Heath Bar. Thanks Cafe Lynnylu for picking it. If you want to check out other people's creations, see the blogroll, of which I am not yet a member because I don't know why. They won't respond to me. I've decided to pretend that I am anyway because I have the book, and I'm not really that good at waiting.


My first ice cream made at home ever! I think it turned out pretty well. I don't have an ice cream maker, so I used David Lebovitz's method. I initially had some trouble with it freezing, since I had put it in the freezer with a lid on the container. So when I went to check on it, it was just cold mixture. This happened a few times, i.e. after two hours it still wasn't freezing. Then I thought, "Maybe I should take off the top." And then magic occurred. Only, I really had to go to bed, since it was already 1:30 in the morning, so I know better now, and I think I can make an even better batch of ice cream next time.

My hand-packed pints.


A delicious bowl of yum.

I think next time I'll either try my first ice cream love mint chocolate chip or maybe a peanut butter cup. We'll see. :)

Monday, July 27, 2009

Curds and Whey

So I've been into making yogurt lately because it's soo easy, and based on the milk prices here, it's actually more economical. I know...crazy! And with making it myself, I can determine the consistency, so I go with the nice thick, Greek-style yogurt. Jacob loves that too.


You can make it a little smoother with some stirring or the addition of some whey, but I'll get to the whey in a minute. Here's the recipe for making yogurt. I don't remember what website I got it off of, but there are plenty out there. Here's the one I make from memory.

Plain Yogurt

1 quart milk (any percentage)
3 tablespoons already prepared yogurt (you can use store-bought or homemade)

1. Pour the milk into a large saucepan and scald. This means to heat up but not boil. Do not boil. I tell when to turn the heat off by looking at the surface of the milk. By then it will have formed a thin skin, and when it's ready it will have reached the "alien stage" as I like to call it. The "alien stage" is when you can see ripples under the skin moving, like something is trying to get out of the milk. After it is doing that steadily, turn off the heat.
2. Let the milk cool down some. This is an important step. If you skip this, you'll kill the yogurt starter and just have some warm milk. I usually let it cool for about 45 minutes to an hour. It needs to just be warm to the touch.
3. Spoon out the skin. You need to take this off, or else you'll be eating it in your yogurt. Mmmm, plasticky yogurt pieces.
4. Stir in the tablespoons of yogurt.
5. Place the mixture, covered, in a warm spot. I like to use the oven with the oven light on. It's warm enough, controlled enough, and enough out of my way. Let it sit in that environment for at least 4 hours. I shoot for 4-5 hours.
6. Refrigerate the yogurt (yes, it's yogurt now) until cool. Then strain if desired. I do suggest a little straining, because it does have a lot of whey produced.
7. Eat and enjoy. Flavor however you want!


This is what I use to strain my yogurt. A sieve over a measuring cup with some cheesecloth. I spoon some of the yogurt in there, put it in the fridge and forget about it for a few hours or overnight...depending on how well I have forgotten about it. The cheesecloth will have your thicker yogurt, and the measuring cup will have caught all of the whey.


When you're done making yogurt, you'll have about this much whey as a by-product. People say you can just drink it. I tried it. It tastes like liquid yogurt. You also can use it in recipes whenever it calls for water. If you do that, you get a more flavorful whatever your making, and it's more nutritious as well, since the whey has a lot of protein and nutrients in it. I've been looking into making some recipes, and I'll post about them later.

But the best thing about making your own yogurt is that you get to flavor it however you want. I've tried honey, jam, lemon curd, and now...

Blueberry Curd! I didn't even know there was such thing as blueberry curd. But blueberries were on sale, and I found this recipe for red currant curd here and thought, why not try, so I did. Here's what I did.

Blueberry Curd
adapted from The Daily Spud

1 pint of blueberries
1/3 cup of water
mounded 1/4 cup of sugar (add more or less to your taste)
pinch of salt
3 tablespoons unsalted butter
4 egg yolks

1. Rinse the berries and put them in a saucepan with the water. Boil for 10-15 minutes until dark purple and pulpy. I squeezed the blueberries that did not pop with the back of my spoon to get an even mixture.
2. Run the mixture through a sieve to remove stems and casing that did not boil down.
3. Return to saucepan and mix in sugar over medium heat until dissolved. Taste and adjust sugar if needed. Add pinch of salt.
4. Whisk egg yolks and add a spoonful of the blueberry mixture to heat the eggs. Then add to the rest of the blueberry mixture, whisking until desired thickness is achieved.
5. Remove from heat and whisk in butter until melted.
6. Let stand or store to let it set up before using.

Now you may remember that I made some biscotti that landed me a gig making a birthday cake. Well, I was experimenting around with cake to find one that would work for the party. I first made a white cake, and it was sooooooo dry. So I did some searches for a more moist cake. Here's one of the cakes I found.

A lemon curd cake. It was pretty easy to make, but I wanted to see if I could make it into a layer cake. The cake was very dense, but I did manage to split it, and I put the blueberry curd I had made earlier in between the layers. Then I covered it all in a cream cheese frosting. The cake was really good. Really lemony, but really heavy and sweet. Definitely a grown-up cake and not a little kid's birthday cake. Darn.

Anyway, here's a cross section.

You may be wondering what that blue thing is at the top of the cake. It was one of my experiments for decorating the birthday cake.

Here's the top view of the cake.

So that blue was a little portion of Cinderella. The part is supposed to be a Disney Princess theme, so I was working on tracing those characters in chocolate to put on the cake. I think it turned out pretty well.

Here's a close-up of Cinderella.

She broke in some places putting her on the cake, so I'm going to reinforce the back with some more chocolate. I'm not exactly sure how many princesses I'll make. We'll just have to see what happens. And pray that I find a cake that's moist and kid-friendly. Pray hard!

Thursday, July 23, 2009

Brownies and the Biscotti that got me a job

So amazingly enough, I've fallen behind again. This is the post for the stuff I brought to Jacob's workplace last week. Ridonkulous, I know.

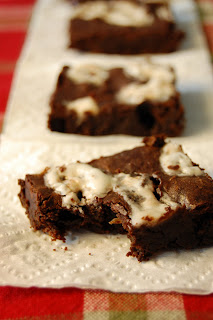
First off, we have Brrownies, which are basically brownies with York Peppermint Patty pieces thrown in. Sticky gooey and delicious. And again, they are from Baking from My Home to Yours.


The recipe said to fold the peppermint pieces in, but that resulted in some pieces at the bottom of the brownies, which then proceeded to fuse to the foil I had covered my pan with. Also, having some of the pieces on top ended up in a marshmallow like goop on top. So to avoid both of these problems, I would suggest putting down half of the brownie mixture in your pan, sprinkling the pieces of York, then covering with the other half of the batter.

Whether it was a pain to get out of the pan, they were worth it. See for yourself.

Going............................................going...................................gone!


I sacrificed so that these pictures could be taken. How noble is that?


Next, I made Lennox Almond Biscotti. And they were an unexpected hit. I got requests for them again. That's the first time that's happened since baking for Jacob's work.


And besides being requested, I got an offer to make a birthday cake for a 3-year-old birthday party. Like a real life client and everything. I've never done it before, but it is my dream to be doing this some day, so I accepted. I'll keep you posted on how things turn out with that.


But so that you can meet with as much success as I did, I'll include the recipe.

Lennox Almond Biscotti
from Baking from My Home to Yours
by Dorie Greenspan

1 1/2 cups all purpose flour
1 1/2 teaspoons baking powder
1/4 teaspoon salt
1/2 cup yellow cornmeal
1 stick unsalted butter, at room temperature
1 cup sugar
2 large eggs
1 1/2 teaspoons pure almond extract (maraschino cherries...mmm)
3/4 cup sliced almonds, blanched or unblanched

Center ad rack in the oven and preheat the over to 350 degrees F. Line a baking sheet with parchment or a silcone mat.

Whisk the flour, baking powder and salt together. Add the cornmeal and whisk again to blend.

Wokring with a stand mixer, preferably fitted with a paddle attachment, or with a hand mixer in a large bowl, beat the butter and sugar togethre at medium speed for 3 minutes, until very smooth. Add the eggs and continue to beat, scraping down the bowl as need, for another 2 minutes, or until the mixtrue is light, smooth and creamy. Beat in the almond extract. Reduce the mixer speed to low and add the dry ingredients, mixing only until they are incorporated. You'll have a soft stick-to-your-fingers dough tha twill ball up around the paddle or beaters. Scrape down the paddle and bowl, toss in the almonds and mix just to blend.

Scrape half the dough onto one side of the baking sheet. Using your fingers and arubber spatula or scraper, work the dough in to a log about 12 inches long and 1 1/2 inches wide. The log will be more rectagular than domed, and bumpy, rough and uneven. Form a second log with the remaining dough on the other side of th baking sheet.

Bake for 15 minutes, or utnil the logs are lightly golden but still soft and springy to the touch. (This took me longer than 15 minutes, probably closer to 25.) Transfer the baking sheet to a rack and cool the logs on the baking sheet for 30 minutes.

If you turned off the oven, bring it back up to 350 degrees F.

Using a wide metal spatula, transfer the logs to a cutting board and, with a long serrated knife, trim the ends and cut the logs into 3/4-inch-thick slices. (I cut mine a little thinner.) Return the slices to the baking sheet--this time standing them up like a marching band--and slide the sheet back into the oven.

Bake the biscotti for antoher 15 minutes, or until they are golden and firm. Transfer them to rack and cool to room temperature.

Happy Baking!

Wednesday, July 22, 2009

Iron Cupcake: Herbs--and my way out

This month's Iron Cupcake Challenge was herbs. I decided to take the easy way out and use mint, because I like mint and you can't go wrong with mint and chocolate.

I wanted to do something a little different though, so I tried to do zebra cupcakes. However, the zebra stripes didn't quite turn out. I think this is due to the fact that my layers must have been too thin. Next time, I think I'll try for fewer stripes and use more batter in each dump.

Nevertheless, the cupcakes turned out yummy, which is always a good thing. So here they are!


Minty Zebra(ish) Cupcakes
inspired from here

2 c. of all-purpose flour
1 tbsp. of baking powder
1/2 tsp. of salt
4 large eggs
1 c. plus 1 tbsp. of white sugar
1 c. of milk
1 c. of vegetable oil
1/2 tsp. of mint extract
1 tsp. chopped mint (more if you want more mintiness)
1/2 tsp. of vanilla extract
2 tablespoons unsweetened cocoa powder

Preheat the oven to 350oF.

Line muffin tin with paper liners.

Stir the flour, salt and baking powder in a bowl.

In a large mixing bowl, mix the eggs and sugar until smooth and light colored, about two minutes on high speed of a hand mixer. Add the oil and milk, and mix for another minute.

Add the flour mixture and mix just until blended. The batter will be of pouring consistency but not thin.

Pour half of the batter into another bowl. In one portion, add mint extract and chopped mint. Stir to blend. Add the vanilla and the cocoa powder to the other portion and stir lightly to blend.

Assemble the cake. Place the baking pan in front of you. Place the bowl of white cake batter to the left of the pan and the bowl of chocolate batter to the right of the pan. Take two small cups of equal sizes (I used two tablespoons; however, if you want to get stripes, you might want to try a bigger size, like a scant 1/4 cup). Pour a cupful of the white cake batter onto the center of the pan. Then, pour a cupful of the chocolate batter directly at the center of the cupful of white cake batter. Repeat until all the cake batter has been poured into the pan.

Bake the cake until a toothpick inserted at the center comes out clean. Mine took 20 minutes to bake.

Then frost with chocolate ganache. Garnish with mint leaf if desired.

Chocolate Ganache

1 cup semi-sweet chocolate chips
2/3 cup heavy cream

Warm cream up in microwave and pour over chocolate chips. Stir until smooth. Dip or spread on cupcakes.

And here are the prizes.

Our June ETSY PRIZE-PACK is from artists:
Last and certainly not least, don’t forget our corporate prize providers: HEAD CHEFS by FIESTA PRODUCTS, http://www.fiestaproducts.com, HELLO CUPCAKE by Karen Tack and Alan Richardson, http://blog.hellocupcakebook.com, JESSIE STEELE APRONS http://www.jessiesteele.com; TASTE OF HOME books, http://www.tasteofhome.com; a t-shirt from UPWITHCUPCAKES.COM http://www.upwithcupcakes.com/. Iron Cupcake:Earth is sponsored in part by http://www.1800flowers.com .

Wednesday, July 15, 2009

TWD: Brioche Plum Tart

I'm not yet officially a part of TWD yet, but I thought I'd try it anyway. I tried to sign up, but the main person was on vacation. But I figured, I have plums, the book, and some time, so I did it. I'm not exactly sure of the rules, though. I did make it yesterday, but I didn't post until today. Am I supposed to post on Tuesday, or am I just supposed to do it sometime during this week? Dunno, but here's my post about it anyways.

You can view the recipe at Denise's blog, Chez Us. Also, check out the TWD blogroll.

You had to start with a brioche tart shell. Here's mine.


Then you had to lay plums in concentric circles in the tart, after a layer of jam was laid.


And then you baked it. It surprised me though, how the brioche pushed up between the plums. I wasn't expecting that.

It was yummy, and fun!

Monday, July 13, 2009

Of Lemons and Cookies

So here's another post about my self-forced commitment to bake twice a week for Jacob's company.

This time I chose to make Lemon Poppy Seed Muffins and Espresso-Chocolate Shortbread Cookies, still from Baking from My Home to Yours.

I really, really enjoyed eating the lemon poppy seed muffins. So much so, that I'm going to include the recipe here. Right after you fall in love with them.

They were so darn delicious. And that was even eating them after they had sat out for a few days, I bet they're even better the first day.


Lemon Poppy Seed Muffins
For Muffins
2/3 cup sugar
Grated zest and juice of 1 lemon
2 cups all purpose flour
2 teaspoons baking powder
1/4 teaspoon baking soda
1/4 teaspoon salt
3/4 cup sour cream
2 large eggs
1 teaspoon vanilla extract
1 stick (8 tablespoons) unsalted butter, melted and cooled
2 tablespoons poppy seeds
For Icing
1 cup confectioner's sugar, sifted
2-3 tablespoons fresh lemon juice

Center a rack in the oven and preheat the oven to 400 degrees F. Butter or spray the 12 molds in a regular-size muffin pan or fit the molds with paper muffin cups. Alternatively, use a silicone muffin pan, which need neither greasing nor paper cups. Place the muffin pan on a baking sheet.
In a large bowl, rub the sugar and lemon zest together with your fingertips until the sugar is most and the fragrance of lemon strong. Whisk in the flour, baking powder, baking soda and salt. In a large glass measuring cup or another bowl, which the sour cream, eggs, vanilla, lemon juice and melted butter until well blended. Pour the liquid ingredients over the dry ingredients and, with the whisk or a rubber spatula, gently but quickly stir to blend. don't worry about being thorough--a few lumps are better than overmixing the batter. Stir in the poppy seeds. Divide the batter evenly among the muffin cups.
Bake for 18 to 20 minutes, or until the tops are golden and a thin knife inserted in the center of the muffins comes out clean. Transfer the pan to a rack and cool for 5 minutes before carefully removing each muffin from its mold. cool the muffins completely on the rack before icing them.
Put the confectioner's sugar in a small bowl and add about 1 1/2 tablespoon of the lemon juice. Stir with a spoon to moisten the sugar, then add enough additional lemon juice, a dribble at a time, to get an icing that is thin enough to drizzle from the tip of the spoon. You can then drizzle lines of icing over the tops of the muffins or coat the tops entirely, the better tot get an extra zap of lemon.

For the Espresso-Chocolate Shortbread Cookies, on page 125, they turned out all right. I made two batches of them, since they were going to a crowd. One batch I used mini chocolate chips, the other I used chopped chocolate, so I got two very different looks.

I found it really difficult to take pictures of these. I still have loads to learn, I suppose.

Berries in the Fridge

Recently, I went to the store and blueberries and raspberries were on sale. So naturally, I had to buy them, even though I had no plans for them. And they sat in my refrigerator for a few days, while I was busy doing other things, and then I realized oh! I need to use those berries.

I was originally going to do a tart, but I didn't have enough eggs. So I had to find a recipe that fit my berries and my number of eggs. I finally did, but it required making two desserts instead of one. Oh darn! I was soooo disappointed. :)

For the raspberries, I made Berry Surprise Cake from Baking from My Home to Yours, page 273. I know...but I like the book, and I still didn't have internet at this time.

The cake was almost a sponge cake, and the filling was a mixture of cream cheese and whipped cream. Overall, the cake was very light, which was nice. The recipe called for a syrup to be spread on bottom layer of the cake, but if I did it again, I would omit this. It just made the bottom a little weird to me.

So with no further ado, Berry Surprise Cake!

Here's a bite.And here's the whole cake.

I tried to get a picture of the inside, but it didn't turn out great. But here is anyhow.

And then with the blueberries, I made Double-Crusted Blueberry Pie, on page 361.

The only thing was, I didn't realize until a few nights after that I only had 2 half pints, not 2 pints of blueberries. The recipe called for 2 1/2 pints of blueberries, so I thought I'd be just a little short, but how wrong I was. It still tastes okay, but it's much flatter than it was supposed to be and not all of the sugar got incorporated. Hee hee.


Here's the whole pie.

All in all, they were fun to make a fun to eat. Good thing, cause I'm still eating them!

Friday, July 10, 2009

Twice a Week

I'm not exactly sure why I did, but I unofficially "signed" myself up for baking something for Jacob's office twice a week, for Wednesday and Thursday. I guess I thought it would give me some much needed purpose for those days, and I guess it has. I just hope our bank account doesn't give up the ghost. :)

So, for last week (remember, I'm behind), I made Allspice Crumb Muffins and Chunky Peanut Butter and Oatmeal Chocolate Chipsters. Both of these are from the Baking from My Home to Yours book, because at this time...no internet, and I really enjoy reading and picking out recipes from that book, although I probably should branch out a bit. But if you have the book, the recipes are found on 16 for the muffins and 73 for the cookies.

For the allspice muffins, I decided to make them mini muffins so that there would be more to go around in the office. I was certain that I had ground allspice, but much to my dismay, no, I only had whole allspice. So I took the length of a movie (I've been going through our collection) to grind enough for a double batch, which was pretty hard with a mortar and pestle. I guess it's good forearm exercise though? Whatever. So here are my mini muffins. I don't think I took that great of a picture though. I think I was tired, and then I got attacked by a spider in my kitchen. It was dangling from a thread right by my face. Me and bugs don't get along, and I'm not even good a killing them. So, after I had a good wig out and finally managed to kill the beast, I was not quite in the mood for photo shooting, so you get what you get.


And here are my peanut butter oatmeal chocolate chip cookies. Jacob really hated the name that came in the book. He thought it was pretty dorky, so I'm just going to call it what it is, minus any frills. These were like three cookies rolled into one, oatmeal cookies, peanut butter cookies, and chocolate chip cookies. I used smooth peanut butter in this recipe because that's what I had on hand, but if I were to do it again, I'd use chunky because the peanut butter flavor was a little lost and I think the chunks of peanut would have helped.

These were great with a glass of milk, but then what cookies aren't?

Thursday, July 9, 2009

I've got a lot of catching up to do

I've finally gotten internet in our apartment. Who knew that it would take a week and a half from when our internet was supposed to be turned on to work out all the problems so that we could actually use the internet. It's been quite frustrating, but I survived...somehow.

So with the move, I have gotten a serious baking bug. I've been baking and baking and baking and baking. And I have so wanted to post about them, so I've been taking pictures waiting for the time when our internet would be working. And now it is.

Just before I left for Texas, my "lunch bunch" buddies got me a gift certificate to Barnes & Nobles, for they wanted to get me a cookbook, but didn't know what I already had. So I took the opportunity to get Baking from My Home to Yours by Dorie Greenspan, since I had heard so many good things about it. So I've been doing a lot of my baking out of that book, since all I had were books to bake by when I got here.

I'm just going to look at two things I've made kind of recently.

First, is Caramel Crunch bars from the aforementioned cookbook. I'm not going to be including the recipe, but it's on page 112 if you have the book.

These were pretty good, but I wish they made a little more. I made these for Jacob's office, and although the recipe says it makes 54 bars, the are very very very small bars (2 in by 1 in). But here they are.


Next, here are some cupcake ball pops I tried making for the end of school. My last hurrah, so to speak. I made two different kinds of cake balls, one chocolate and cream cheese icing, the other red velvet and strawberry icing. I had originally wanted to do chocolate with strawberry and red velvet with cream cheese, but I mixed the wrong ones and didn't realize until it was waaay too late.

These pops were incredibly difficult to make, and very time consuming. I've made cake balls plenty of times before, but the double dipping, and shaping, and freezing, and sticking took soo long. I stayed up half the night and some of the morning finishing them. And in the end, they hardly looked like cupcakes. I have no idea how Bakerella does it. I think it'll be a while until I try again.